• Create Menu
  • Settings
    • General Settings
    • Tour Settings
    • Hotel Settings
    • Space Settings
    • Car Settings
    • News Settings
    • Booking Settings
    • User Settings
    • Vendor Settings
    • Payment Settings
    • Styling Settings
    • Advance Settings
    • Email Settings
  • Home page
    • Using Templates
    • Build Home Page
    • Contact Manager
  • Booking Core Elements
    • Form Search All Service
    • Offer Block
    • Tour Form Search
    • Tour List item
    • Space Form Search
    • Space list item
    • Space Term Featured box
    • Hotel Form Search
    • Hotel List item
    • Car Form Search
    • Car List item
    • News List item
    • List Featured Item
    • List Locations
    • Call to Action
    • List Testimonial
    • Text
    • Vendor Register form
    • Video Player
    • FAQ's Block
  • Hotel Manager
    • Hotel Listing
    • Creating Hotel
    • Creating Room
    • Attributes Hotel
    • Hotel Settings
  • Car Manager
    • Car Listing
    • Creating Car
    • Attributes Car
    • Car Settings
  • Tour Manager
    • Tour Listing
    • Creating Tour
    • Tour Category
    • Attributes Tour
    • Tour Settings
  • Space Manager
    • Space Listing
    • Creating Space
    • Space Category
    • Attributes Space
    • Space Settings
  • Location
    • Location management
    • Create Grid Location
  • News
    • Creating News
    • News Listing
  • User Manager
    • Create new User
    • Roles Manager
    • Verify Manager
    • Subscribers Manager
  • Vendor Manager
    • Register a Vendor
    • Vendor Settings
    • Vendor Payout
  • Review Manager
  • Reports
    • Booking Reports
    • Booking Statistic
    • Contact Submissions
    • System Log Viewer
  • Language Settings
    • Language
    • Translations
    • Multi-language
 
  • Docs »

      Create Menu

      Create normal Menu:

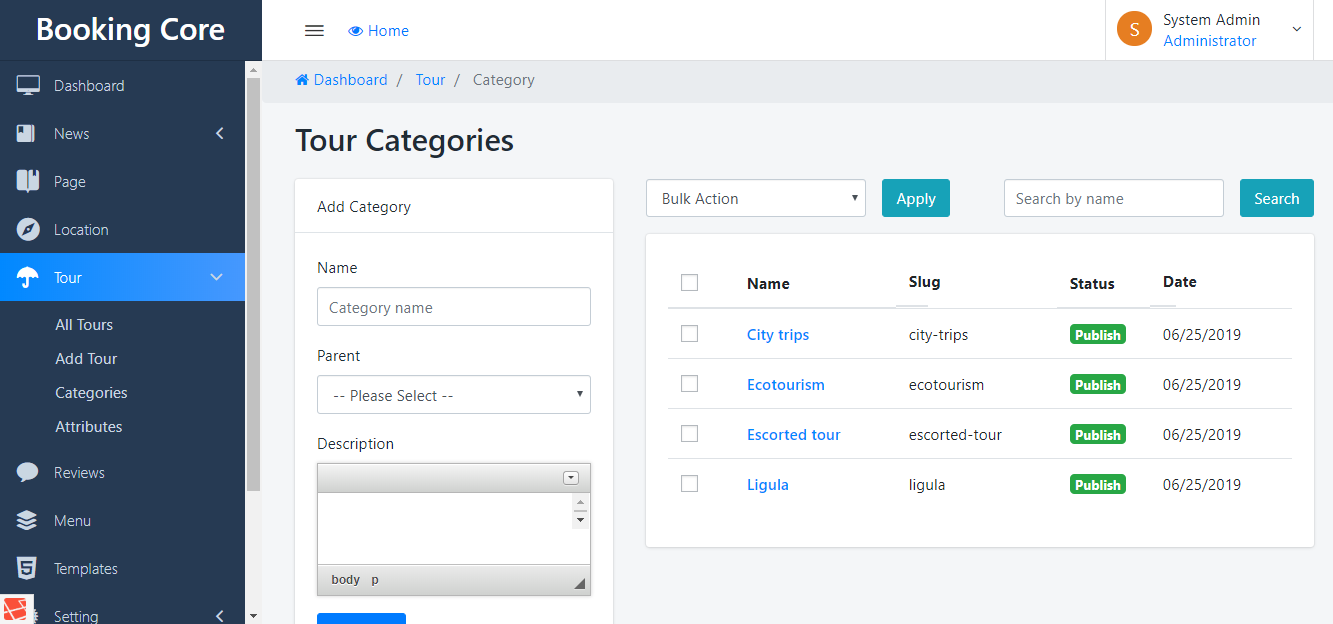
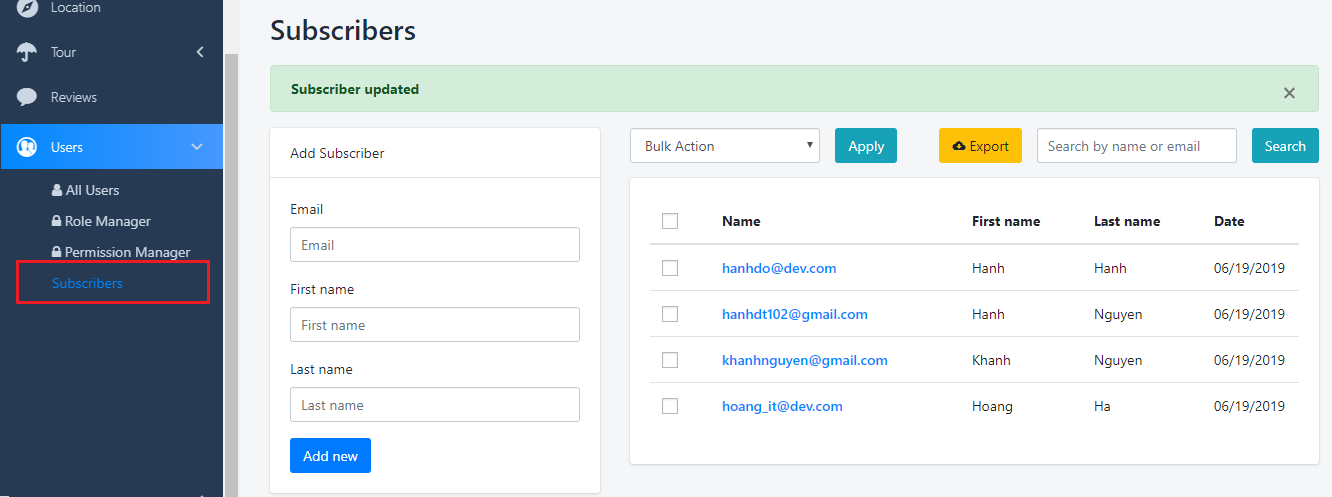
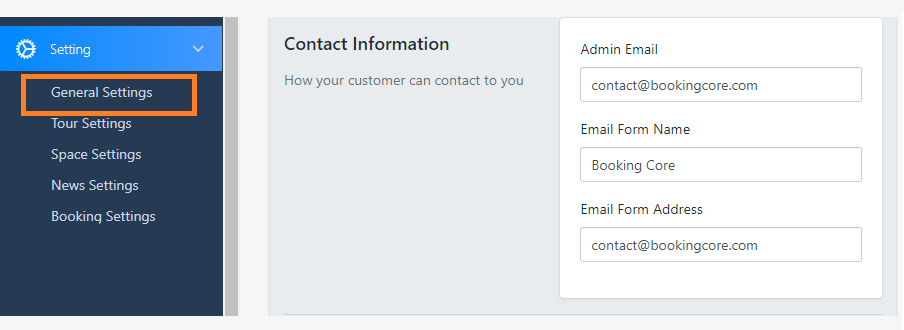
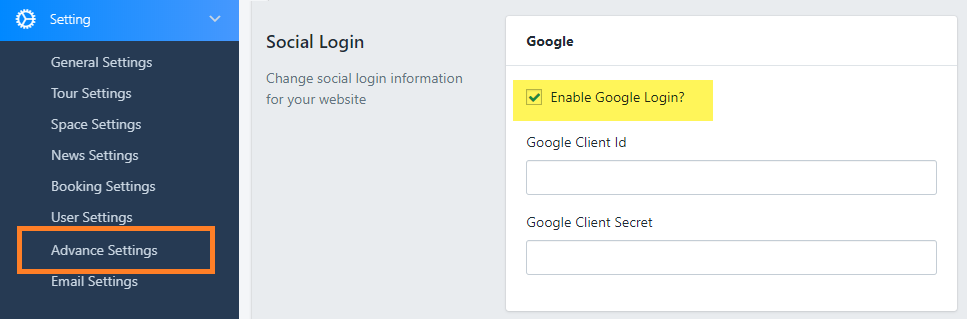
      To Setup A New Menu, Follow The Steps Below.

      Step 1 : Navigate to Dashboard > Menus section of your admin.

      Step 2 : Click the “Create A New Menu” link to make a new menu. Enter the name then hit the “Create Menu” button.

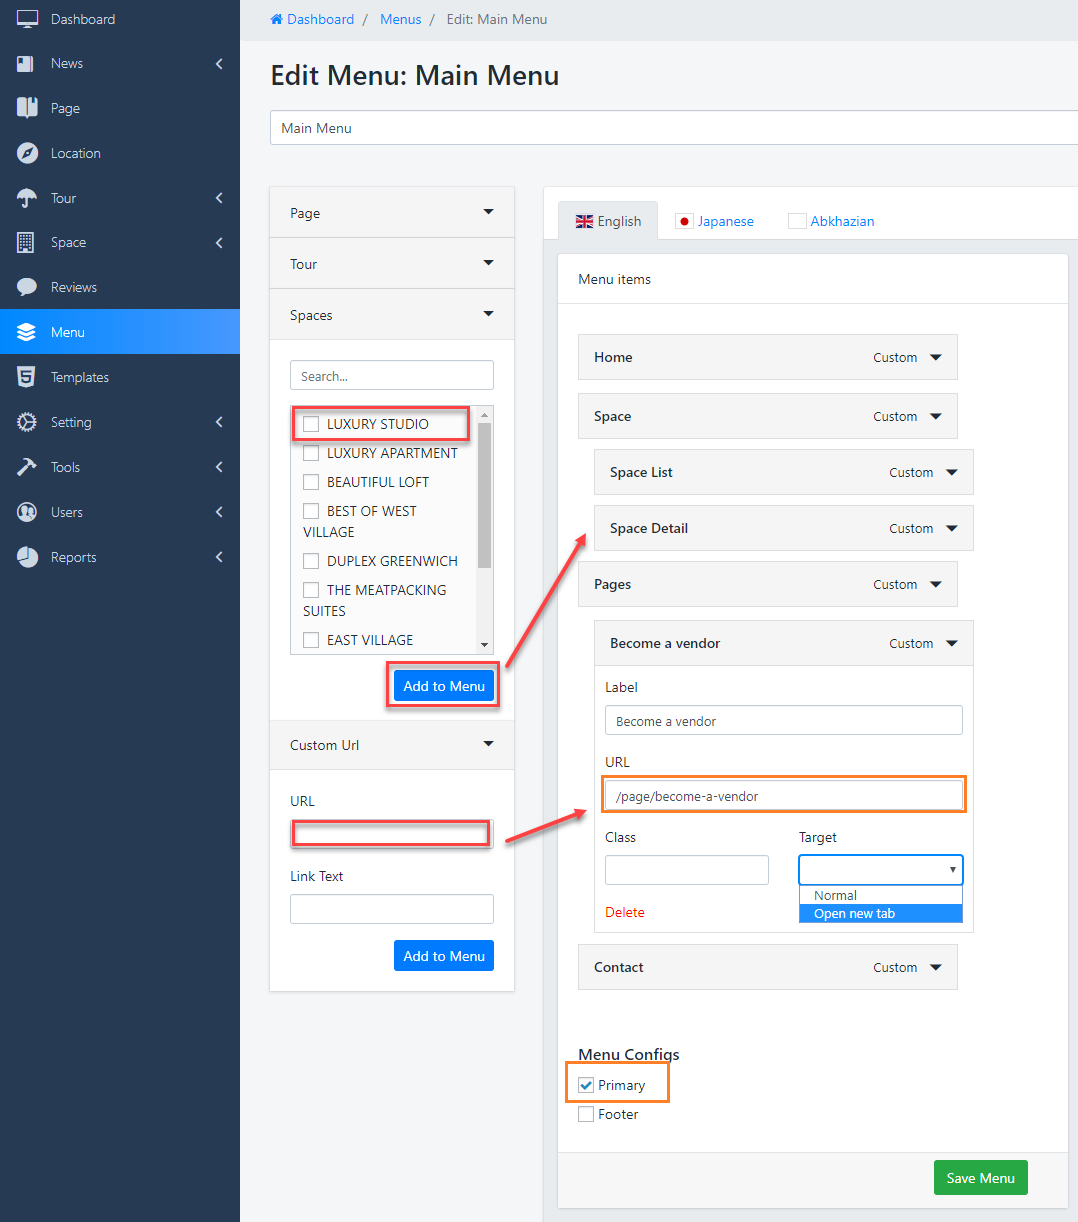
      Step 3 : To add a menu item, select one of your created pages on the left hand side and click “Add to Menu”. You can also add all kinds of different posts from the left side.

      Step 4 : To add a custom menu item, enter a custom name and link into the “Links” box.

      Step 5 : Manage your menus by using the drag and drop functionality. To create a dropdown menu, simply drag a menu item below and slightly to the right of another menu item and it will lock into place and create a dropdown section.

      Step 6 : After setting up your menu, scroll down to the bottom of the page to assign Primary Navigation .

      Step 7 : Once its all done, make sure you click the “Save” button.

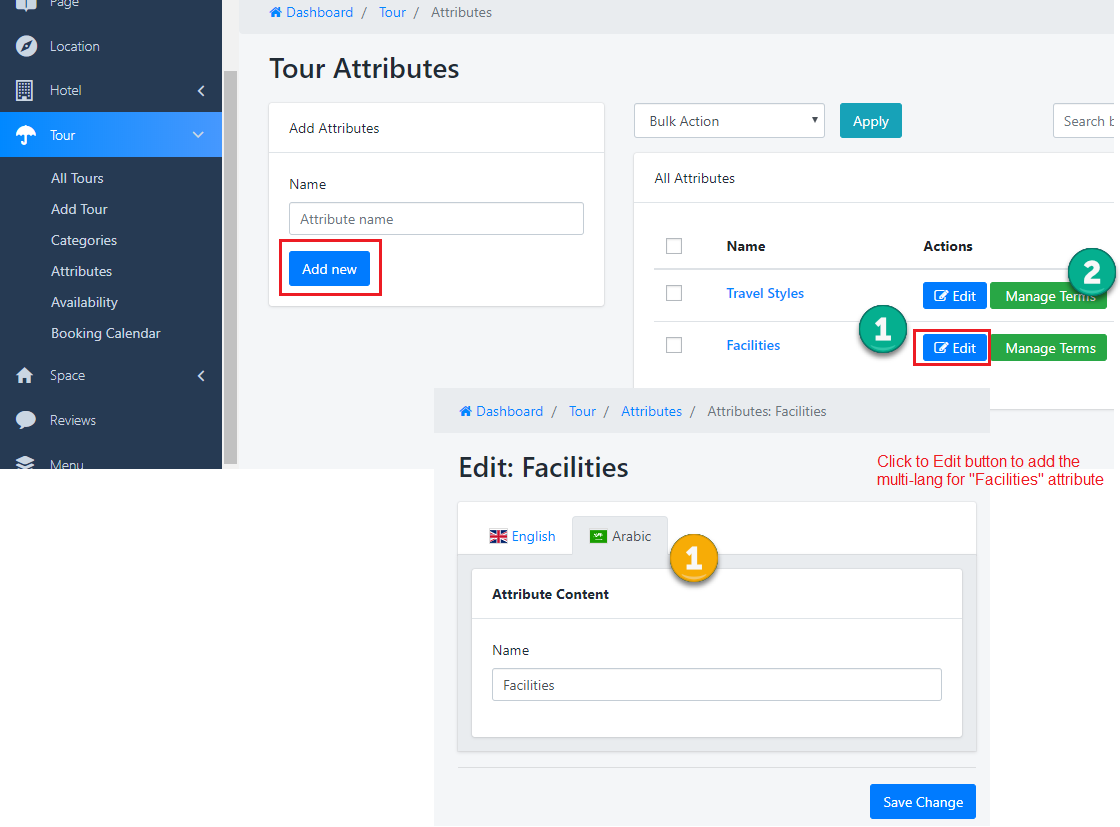
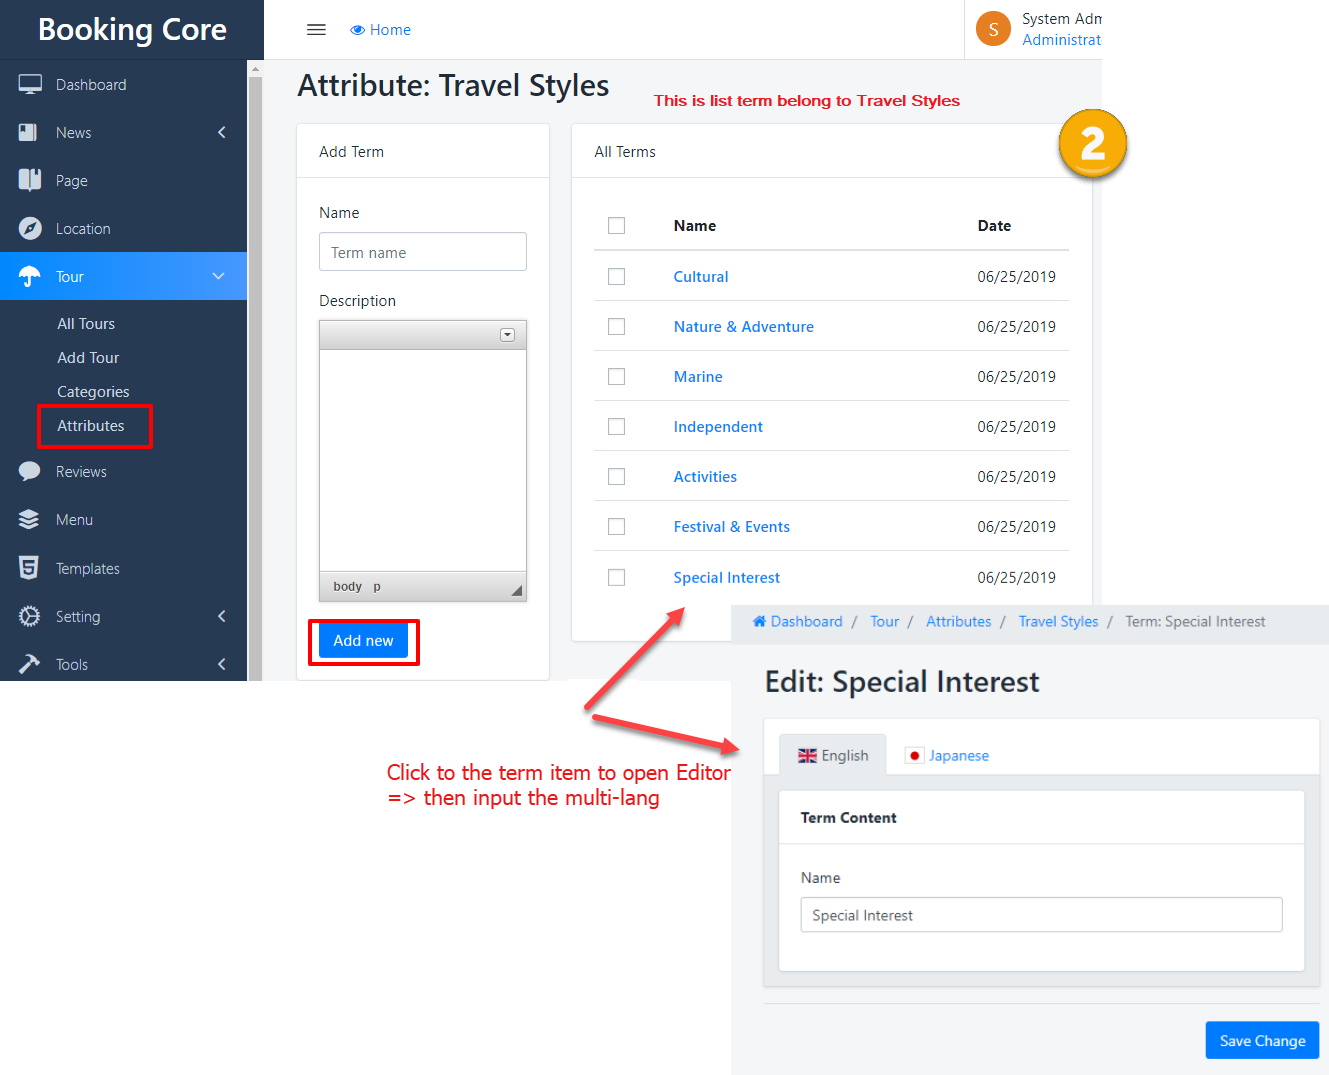
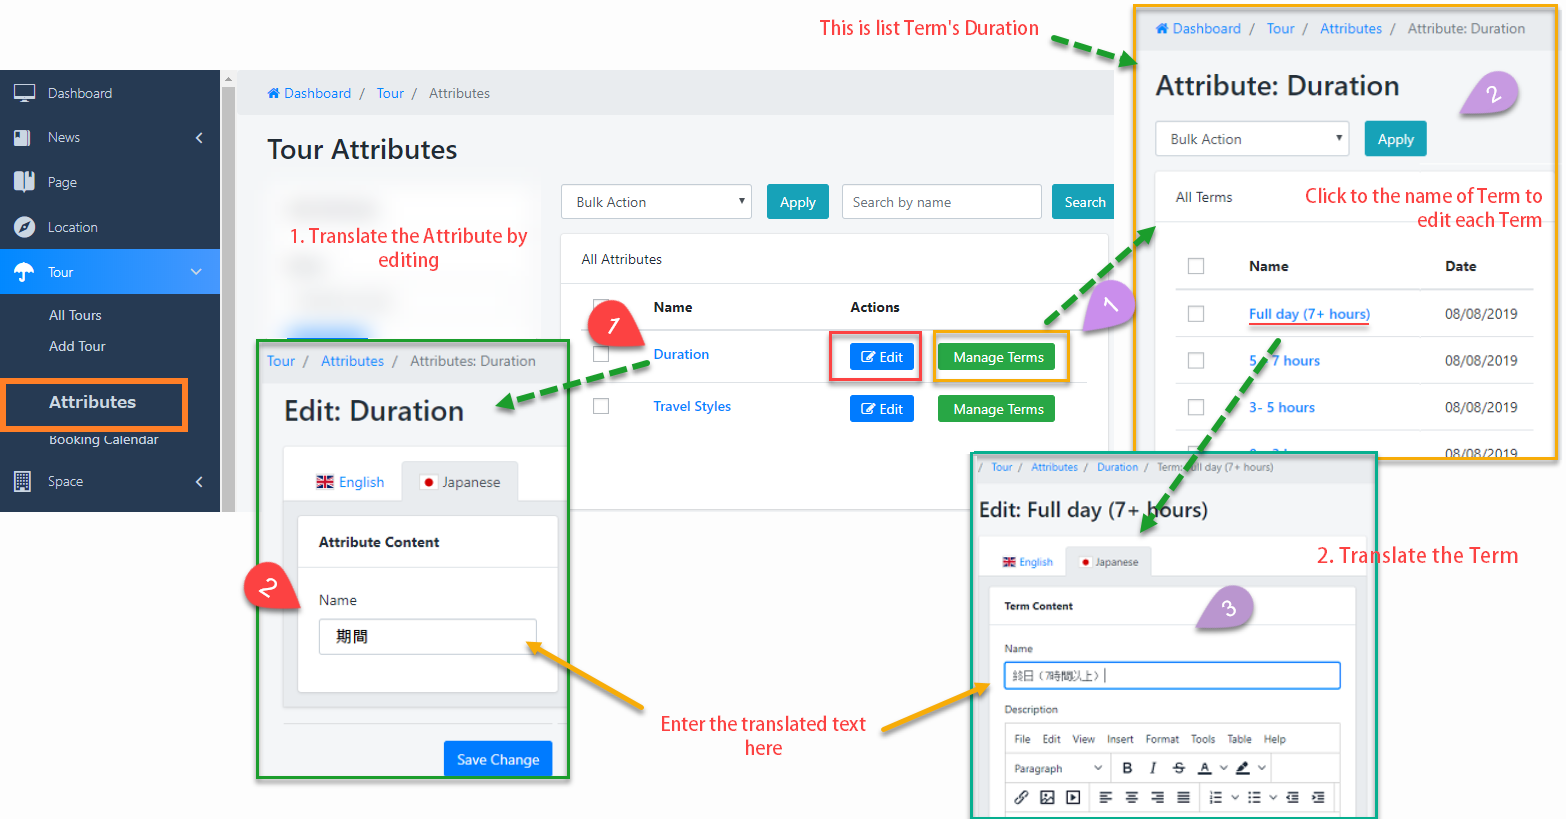
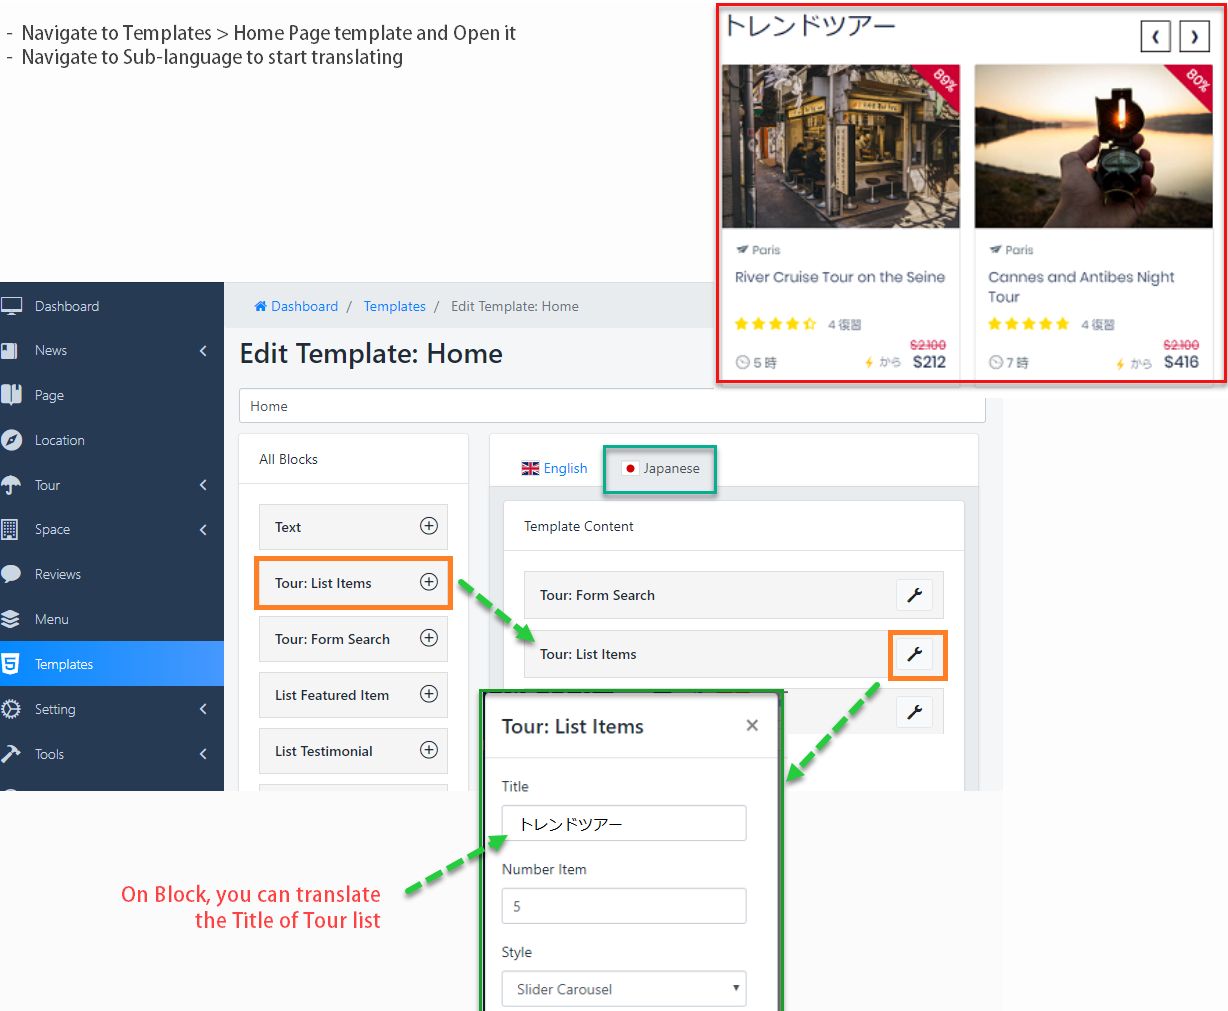
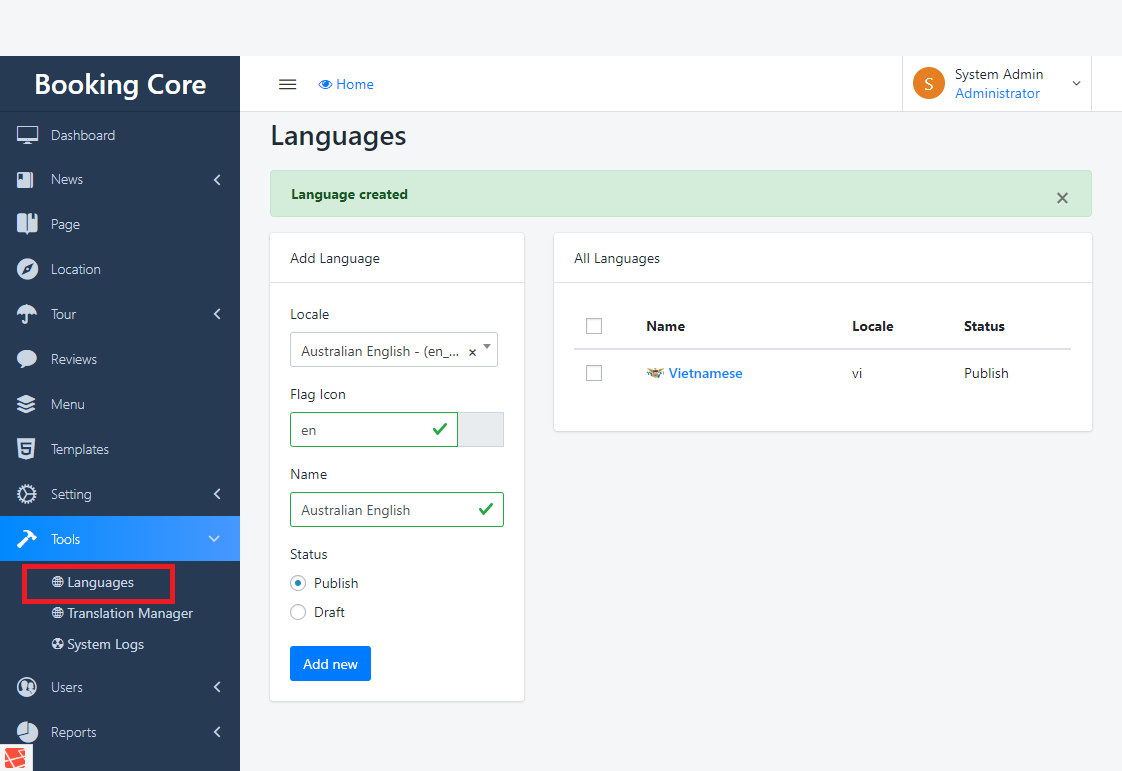
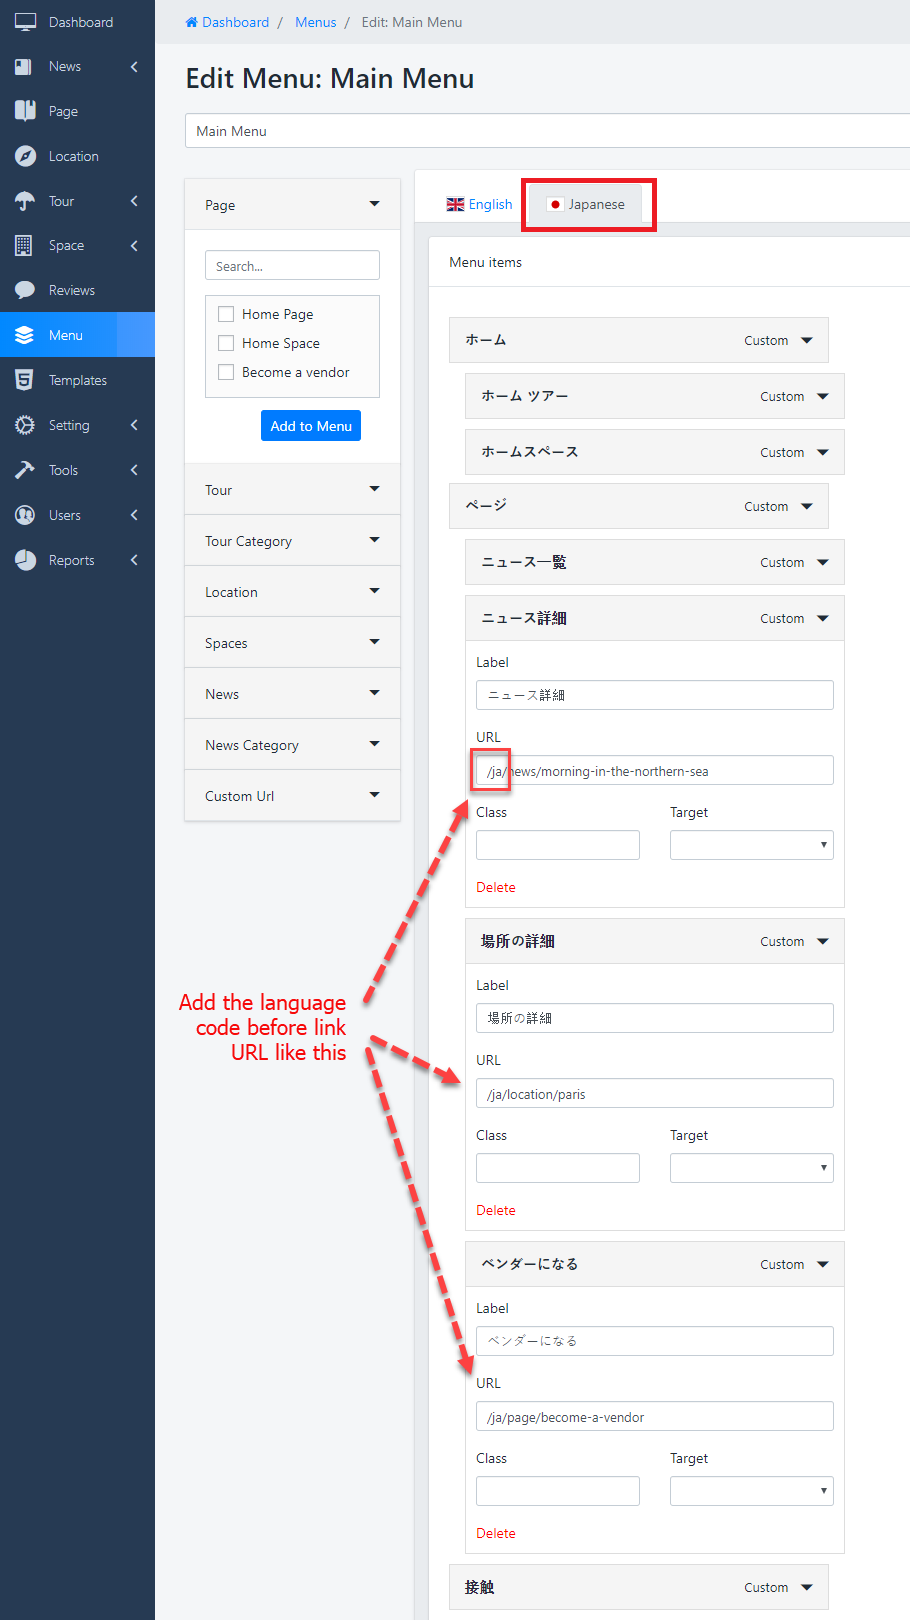
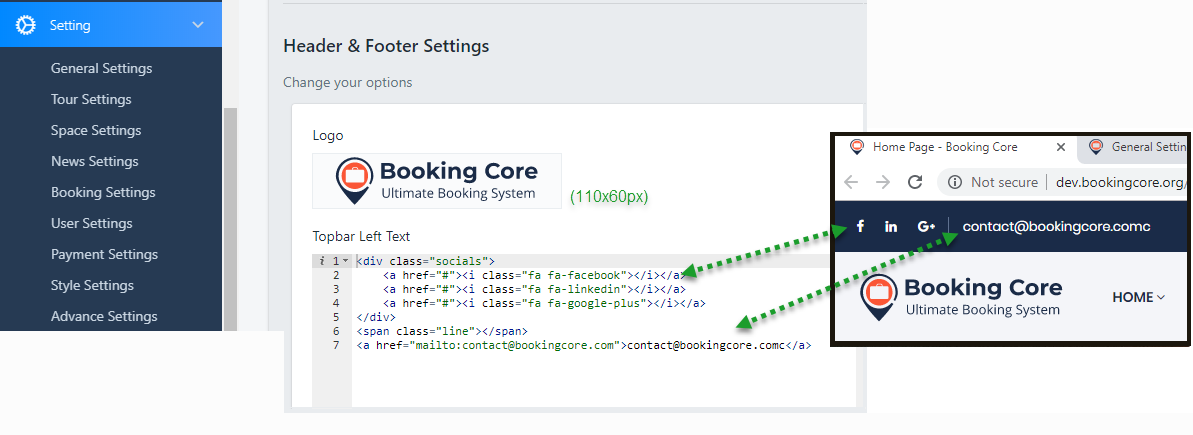
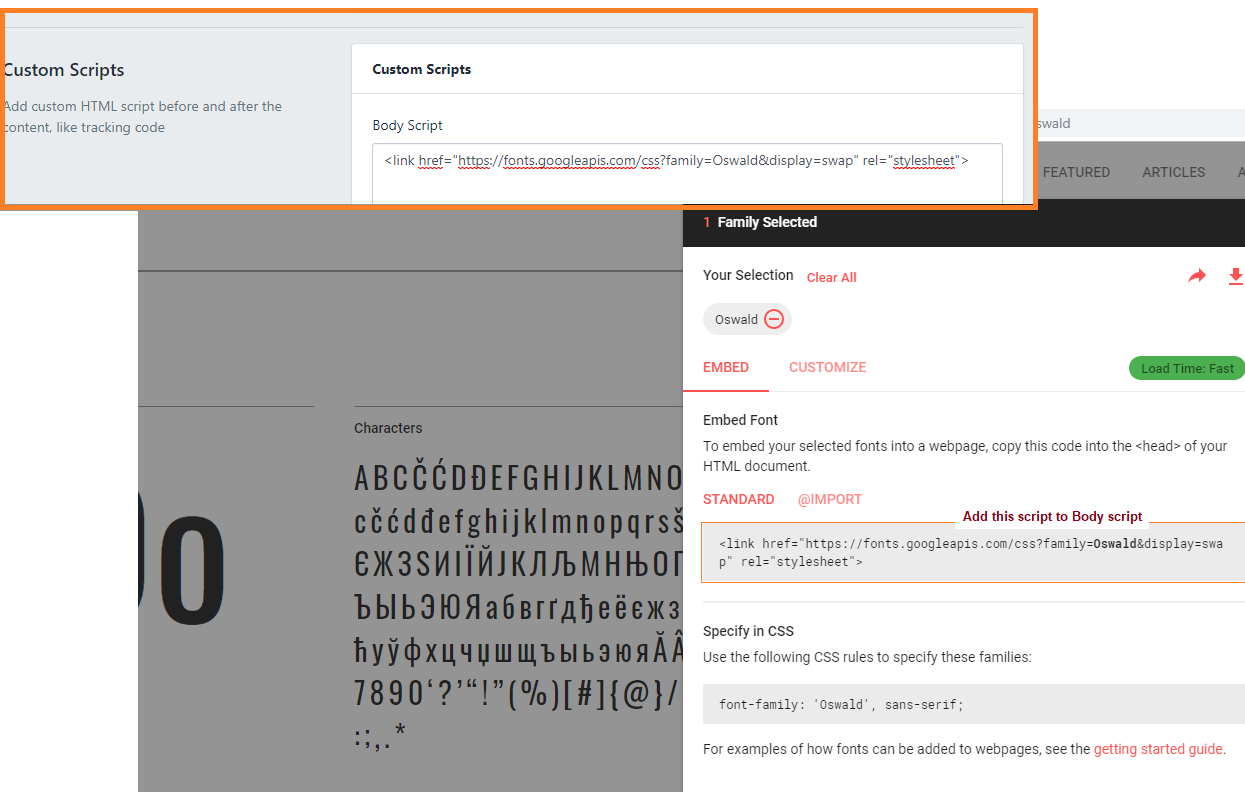
      Add link for Multi-language of Menu:

      Navigate to other languages then add the code of language to link, see the image below:

      General Options 

      1. General Settings:

      –  Site Information: Allow you to upload logo for your site on Top Header

      - Date Format: Enter the Date format that fit your Country

      Here we formatted the date with 'j M Y H:i:s A e' so it gives

      • j – Day of the month without leading zeros ( 1 to 31 )
      • M – A short textual representation of a month, three letters ( Jan through Dec )
      • Y – A full numeric representation of a year, 4 digits ( Examples: 1999 or 2003 )
      • H:i:s – Hours, minutes and seconds
      • A – AM / PM
      • e – Time zone ( default UTC )

      Or read more here


      –  Language: Select the language that you want to use on Site, default English.


      –  Contact Information: This address is used for admin purposes. Clients will contact you via this email address

      –  HomePage: Select the page that you want to set it as Home Page


      2. Header and Footer Settings

      – Header Settings: Enter your information to change the Default infor

      From version 1.2, the content of Top bar is built in Code Editor:


      – Footer Settings: Include Footer section and Footer bottoms

      Default: there are 4 columns with size Col-3, just need to change the Content of each column, or change the number of column by the way you want

      You can use HTML code on each column, that makes your information look nicer


      3. Contact Informations

      Navigate to Dashboard > Page contact settings:

      Enter content for contact here, some personal information you may change:

      Tour Settings

      –  Tour Settings : This provide you some options that help you adjust layout Search for Tour.

      1. Title page: the text show on the top site bar

      2. Image banner: You should use image with size: 1920 x 500(px)

      3. Layout Search: now we are supporting 2 styles layout Search for Tour: Normal layout and Map layout

      4. From version 1.3.0, our Booking Core system is ready for Smart search features, which means you can easily use Search feature on your website. Here are some guidelines:

      SEO Manage:

      If you don't need SEO on site, just need to leave the blank those field below:

      Review Tour options

      Click on Dashboard > Settings > Tour Settings

      • Write Review: Allow you to turn ON/OFF review form for Tour
      • Enable review after booking: Check to the box to REQUIRE booking a Tour before doing Review
      • Review approved: Check to the box to REQUIRE admin's approving the Review before Public
      • Review criteria: You can also create other evaluation criteria for your Tour by clicking button Add new or red trash icon on the right top of each option.

      Booking Fee:

      From version 1.3.0, Admin can Add Booking fees for space and tour, such as: tax fees, Insurance fees, booking fees.. All this fees will come to Admin Amount

      Vendor Option:

      There are 2 options to limit vendor processing rights:

      • Tour created by vendor must be approved by admin: When vendor posts a service, it needs to be approved by administrator Or not
      • Allow vendor can change their booking status

      Space Settings 

      –  Space Settings : This provide you some options that make you re-build the Space Page by your ideas

      1. Title page: the text show on the top site bar

      2. Image banner: You should use image with size: 1920 x 500(px)

      –  Space Review :

      Click on Dashboard > Settings > Space Settings

      • Write Review: Allow you to turn ON/OFF review form for Space
      • Enable review after booking: Check to the box to REQUIRE booking a Space before doing Review
      • Review approved: Check to the box to REQUIRE admin's approving the Review before Public
      • Review criteria: You can also create other evaluation criteria for your Space by clicking button Add new or red trash icon on the right top of each option.

      Booking Fee:

      From version 1.3.0, Admin can Add Booking fees for space and tour, such as: tax fees, Insurance fees, booking fees.. All this fees will come to Admin Amount

      Navigate to Settings > Space Settings scroll down to Booking Buyer Fees, similar to Tour just need to input the fees you want to add for Space

      Vendor Option:

      There are 2 options to limit vendor processing rights:

      • Space created by vendor must be approved by admin: When vendor posts a service, it needs to be approved by administrator Or not
      • Allow vendor can change their booking status

      News Settings 

      –  News Settings : You can change some information on this Page Setting: Title, image banner, Some Widget on sidebar, check the image below:

      Booking Settings 

      Navigate to Dashboard > Settings > Booking Settings

      1. Checkout Page:

      - Enable captcha for Booking form: Check to this checkbox to TURN ON it

      - Terms & Conditions page: this page need to be created in Page menu

      2. Booking Email

      This is the way Booking email shows:

      Payment Settings

      • Title: Enter title for currency
      • Currency name: Select on the list of currencies name
      • Format: this controls the position of the currency symbol.
        Ex: $400 or 400 $
      • Thousand Separator: Specifies what string to use for thousand of separator. Depending to your currency, you can change to other symbols.
      • Decimal Separator: Specifies what string to use for Decimal separator. Depending to your currency, you can change to other symbols
      • Currency decimal: Adjusts the number of digits after decimal.


      Payment gateways

      Booking Core allows you to use 3 ways for payment: Offline payment, Paypal and Pay Stripe

      1. OFFLINE PAYMENT

      To activate this option, Navigate to Dashboard > Settings > Payments Settings > Payment Gateway to Enable Offline Payment

      • This method allow your user can book service, but they don’t need to pay immediately.
      • They can select the service then go to Your Office to pay.
      • To enable this method you just need to Enable Submit Form.

      You can also change the submit form logo as well.


      2. PAYPAL PAYMENT

      • This method allow your user can book service, and they can pay immediately via Paypal account.
      • To enable this method you just need to Enable Paypal
      • Continue enter your paypal information.

      If you enter the wrong information, the client’s Booking can’t do anymore.


      3. PAYSTRIPE PAYMENT

      • This method allow your user can book service, and they can pay immediately via Stripe account.
      • To enable this method you just need to Enable Stripe
      • Continue enter some information as: Your Stripe Secret Key,  Enable Sandbox Mode, Your Stripe Test Secret Key for Sandbox mode

      If you enter the wrong information, the client’s Booking can’t do anymore.

      User Settings

      1. Enable Captcha for Login/Register Form

      Navigate to Dashboard > Settings > User Settings, in this panel you can check/ uncheck to the box to Enable / Disable the Captcha option


      2. Chat box

      + Live Chat for Customer and Vendor


      2. Edit Email content

      This is Register email content for User:

      Check to the box if you want to send email to User after registering new account

      And this is Notify email to Admin when have new Register, check to the Checkbox to Enable sending email to Admin

      This is content of Forgot Password, you can change it easy here:

      Vendor Settings

      1. Vendor Register

      + Vendor Auto Approved: check to the box if you don't want to check User before upgrading to Vendor

      + Vendor Role: select the Role you want user become

      2. Vendor Commission

      + Vendor Enable: Check to the box if you want to Active the Vendor System

      + Commission system in settings: This is default commission value, then select the Commission Type and input the commission value

      We have other way to set Vendor commission in Edit User, just need to Edit User then set their Commission Value

      If you want to set commission for each vendor, just need Edit User and input the commission value here, leave blank if you want to use Default Value in the Settings above


      Styling Settings

      – Main Color: Select the color you want to set as Main Color for site

      Custom CSS code: Allows you to enter custom CSS code to make some custom changes in site.

      On the screenshot, we add some CSS code for changing the text on Header.

      If you are developer, this options is quite useful for you

      Change the Google Font

      Font Family: input the font you want to use on the site

      Font Size: input the font size corresponding with the Font Family

      Color: select the color for the site

      Line Height

      Add script:

      Advance Settings 

      Go to Settings > Advance Settings > Map Provider: now we support 2 map providers: Google Map and OpenStreetMap.org

      If you use OpenStreetMap.org, you don't need to input any API key, it's free.

      –  Google Map API Key: Enter your google API key to this field

      From June 22, 2016 google no longer support key-less access (any request that not include an API key).  That is reason why the map on your site is missed.

      This post, we will guide you  “How to get Google API for site”?.

      To get Google API, Go to this page to Register your application for Google Maps


      2. Social Login:

      Navigate to Dashboard > Settings > Advance Settings > Social Login

      - Facebook Login: check to the box to allow login by Facebook account, read more in this guide to know how to create FB API

      Make a note of your OAuth Settings

      At the step: Configure the Redirect URI

      Read more here


      - Google Login: check to box to enable Login by Google account

      Get a client ID and client secret

      1. Open the Google API Console Credentials page.

      2. From the project drop-down, select an existing project or create a new one.

      3. On the Credentials page, select Create credentials, then select OAuth client ID.

      Remember: In the Redirect URI input, need to use link:yourdomain.com/social-callback/google

      4. Under Application type, choose Web application.

      5. Click Create.


      - Twitter Login: check to the box to allow login by Twitter account

      How to create a Twitter application:

      • 1. Visit the Twitter Developers Site.
      • 2. Sign in with your Twitter Account.
      • 3. Go to “My Applications”
      • 4. Create a New Application.
      • 5. Fill in your Application Details.
      • 6. Create Your Access Token.
      • 7. Choose what Access Type You Need
      • 8. Make a note of your OAuth Settings.

      Remember: In the Redirect URI input, need to use link:yourdomain.com/social-callback/twitter

      Read more here

      Or you can try to watch this video

      - Captcha: check to box to allow Enable captcha in login/register form

      - Custom Scripts: Add custom HTML script before and after the content, like tracking code

      Email Settings

      Now we are supporting 9 mail servers: SMTP, SENDMAIL, MAILGUN, MANDRILL, SES, SPARKPOST, POSTMARK, LOG, ARRAY

      Below is simple guide of Mailgun Config:

      1. Go to this link to get mailgun API key
      2. Scroll down to the Config Email Server, then enter some required informations:

      Email Testing: In case of necessity, you can input the email address into this box to check the mailing activity of your site

      Building Home Page

      Create New Page

      - Navigate to Dashboard > Page > Add new button

      - For pages you usually just need to enter title and information for the article, not using any particular template.

      Using Template for Page

      The template is built only for specific pages, with lots of information with special styles, see How to build homepage template.

      SEO page is good Feature That makes Google search friendly


      Building Home Page 

      Create a template

      To create Front page:

      Step 1: Navigate to Template to build Home page content with Booking Core Elements

      Step 2: Press to the + icon to ADD new Element to the Template

      Step 3: Navigate to Pages > Add new Page


      Step 4: Page Attributes box in right: choose Home template and Save the Page

      Step 5: Navigate to dashboard Settings > General Settings > Home page> Select the page created into the front page.

      Building Home Page

      Contact Manager

      All email from the Page Contact will be added to this listing, Admin can check and contact to User by his way

      Navigate to Report > Contact Submissions

      Easy to Delete or Search email

      Booking Core Elements

      Dashboard > Templates > Build Template

      1. Form Search All Service

      This is the way it shows on Home page

      To build this element, In Template find element Form search all Serveice, check to element you want to show in the search form, then input Title + Sub title + Upload Background

      You should use image with size 1900x600(px) and remember to do optimize before uploading

      Booking Core Elements

      Dashboard > Templates > Build Template

      2. Offer Block

      This section allows you to give the best recommendations to your customers as well as be designed to make your website look better.

      The first row of this block has 3 items, from the 2nd row onwards will be 4 items per row

      In the first section, you should use photos of size 570x400 for the best quality.

      To build this block, find block with name: Offer Block then press to "Add icon", it will be added to template. Continue input some needy information

      • Title: Input the recommendations title for clients
      • Desc: in this field you can use HTML tag like the available sample
      • Background Image Uploader: From the second item, you should use photo with size 270x400 (px) for Background image
      • Title + Link of More button: Input the text + link to the Link More field if you want to show a button in the Description
      • Featured text: the text is showing at the top-left corner
      • Featured icon : the icon is showing at the top-left corner below the Featured Text, find icon class in https://iconfont.com

      Booking Core Elements

      Dashboard > Templates > Build Template

      3. Form Search Tour

      Image Banner with Search form, to build this section, just need to enter some information below:

      • Sub-title: The small text above the Big Title
      • Title: Input the Text to set Title of Section
      • Background: Upload image to set Banner background for Home

      Booking Core Elements

      Dashboard > Templates > Build Template

      4. List Tour

      This element gives you many options for custom layout. There are 2 styles to show list Tour: Slider and Row section

      • Step 1: Enter Some Information like: Title(title of Section) and number item you want to show on Section
      • Step 2: Select Style for Tour section
      • Step 3: Filter by Category or Filter by Location, depends on your design. Leave blank if you don't want to filter them
      • Step 4: Select Order list (Optional)

      Booking Core Elements

      Dashboard > Templates > Build Template

      5. Space Form Search

      This block will help you create Search form in separate Space page, this is the way it shows on Home page

      Image Banner with Search form, to build this section, just need to enter some information below:

      • Sub-title: The small text above the Big Title
      • Title: Input the Text to set Title of Section
      • Background: Upload image to set Banner background for Home

      Booking Core Elements

      Dashboard > Templates > Build Template

      6. Space list item

      There are 2 styles for Space List item:

      1. Row section with 4 items per Row
      2. Slider style with 3 items per Slider

      This element gives you many options for custom layout. There are 2 styles to show list Space: Slider and Row section

      • Step 1: Enter Some Information like: Title(title of Section) and number item you want to show on Section
      • Step 2: Select Style for Space section
      • Step 3: Filter by Category or Filter by Location, depends on your design. Leave blank if you don't want to filter them
      • Step 4: Select Order list (Optional)

      Booking Core Elements

      Dashboard > Templates > Build Template

      7. Space Term Featured box

      This is the way the Featured box shows:

      Booking Core Elements

      Dashboard > Templates > Build Template

      8. Hotel Search form

      This block will help you create Search form in separate Hotel page, this is the way it shows on Home page

      Image Banner with Search form, to build this section, just need to enter some information below:

      • Sub-title: The small text above the Big Title
      • Title: Input the Text to set Title of Section
      • Background: Upload image to set Banner background for Home

      Booking Core Elements

      Dashboard > Templates > Build Template

      9. Hotel List item

      There are 2 styles for Space List item:

      1. Slider Style: Row section with 4 items per Slider

      2. Grid Style: Row section with 4 items per Row

      To create this section, Go to Dashboard > Templates > Build Template > Hotel: List Items then input some needy informations

      • Step 1: Enter Some Information like: Title(title of Section) and number item you want to show on Section
      • Step 2: Select Style for Hotel section
      • Step 3: Filter by Location, depends on your design. Leave blank if you don't want to filter them
      • Step 4: Select Order list (Optional)

      Booking Core Elements

      Dashboard > Templates > Build Template

      10. Car Search form

      This block will help you create Search form in separate Car page, this is the way it shows on Home page

      Image Banner with Search form, to build this section, just need to enter some information below:

      • Sub-title: The small text above the Big Title
      • Title: Input the Text to set Title of Section
      • Background: Upload image to set Banner background for Home

      Booking Core Elements

      Dashboard > Templates > Build Template

      11. Car List item

      Grid Style: Row section with 4 items per Row

      To create this section, Go to Dashboard > Templates > Build Template > Car: List Items then input some needy informations

      • Step 1: Enter Some Information like: Title(title of Section) and number item you want to show on Section
      • Step 2: Select Style for Car section
      • Step 3: Filter by Location, depends on your design. Leave blank if you don't want to filter them
      • Step 4: Select Order list (Optional)

      Booking Core Elements

      Dashboard > Templates > Build Template

      12. News List item

      There are 2 styles for Car List item:

      1. Slider Style: Row section with 4 items per Slider

      2. Grid Style: Row section with 4 items per Row

      To create this section, Go to Dashboard > Templates > Build Template > Hotel: List Items then input some needy informations

      • Step 1: Enter Some Information like: Title(title of Section) and number item you want to show on Section
      • Step 2: Select Style for Hotel section
      • Step 3: Filter by Location, depends on your design. Leave blank if you don't want to filter them
      • Step 4: Select Order list (Optional)

      Booking Core Elements

      Dashboard > Templates > Build Template

      13. List Featured Item

      This element will help you show the best of what you can do for your customers

      Style 1 Style 2 Style 3
      • Step 1: Press to ADD NEW button to open New form content
      • Step 2: Enter Title, Sub Title and Upload Image
      • Step 3: After enter Full information, Remember to Press to SAVE CHANGES
      • Step 4: You also Remove the item that you don't need to show on section
      • Remember: there are 3 items per row.

      Booking Core Elements

      Dashboard > Templates > Build Template

      14. List Location

      This element will help you show a service content:

      • Step 1: Select Service for Location section
      • Step 2: Enter Some Information like: Title(title of Section) and number item you want to show on Section
      • Step 3: Select Order list: remember set to Order DESC by Date Create (default)
      • From version 1.3.0, we have detail page for Location, you can also check to the box to redirect to Single Location instead of showing service(List Tour/Space/Hotel ) by location

      This is the way Location grid show

      Grid Location Style 1 
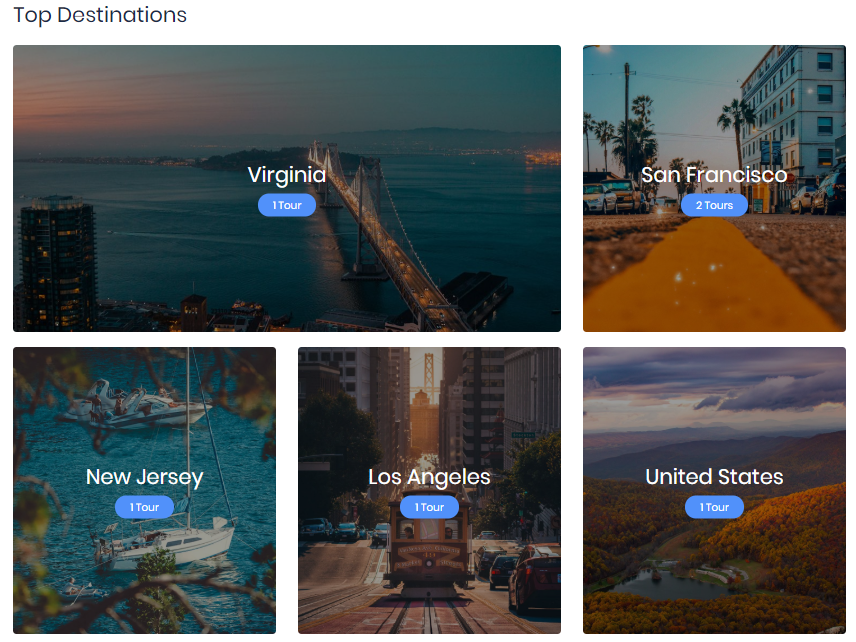
Grid Location Style 2 Grid Location Style 3 Grid Location Style 4

      Booking Core Elements

      Dashboard > Templates > Build Template

      15. Call to Action

      This section provides information as an offer for customers who want to become Website partners, to build the section, enter some information below:

      • Title: Enter a special title to attract customers' interest
      • Sub-title: Short description of an attractive offer, attractive reasons for ventor

      Booking Core Elements

      Dashboard > Templates > Build Template

      16. List Testimonial

      Show as the Row section, there are 3 items per Row. This is Review for your Website, should use the Best Comment. To build this section just need to enter some information below:

      • Step 1: Enter Title of Section
      • Step 2: Press to the ADD NEW to Open form content
      • Step 3: Enter Name and the User's Comment
      • Step 4: Select the Star point as the customer satisfaction rating
      • Step 5: After building the Testimonial, Remember to SAVE CHANGE anything before Closing

      Booking Core Elements

      Dashboard > Templates > Build Template

      17. Text Element

      This element is additions, you can use :

      • Service Styles:
      • Content Align: Right, Center, Left
      • Icon: Icon for the element
      • Title: Name of the service
      • Desc: Description about it

      Booking Core Elements

      Dashboard > Templates > Build Template

      18. Vendor Register form

      This is the way it shows in Register page:

      Same as the other block, find the element Vendor Register form then input informations: Title, Description, youtube link and Featured image for youtube link.

      But you need to input the link youtube video to show image background, because image is set as the Featured image of video.

      Booking Core Elements

      Dashboard > Templates > Build Template

      19. Video Player

      This is video background section:

      Input the title, Youtube link and background image that is set as the Featured image of video

      Booking Core Elements

      Dashboard > Templates > Build Template

      20. FAQs Block

      This is the way the FAQs block shows

      There are 2 columns per row

      To create this FAQs list, find in Template Blocks > FAQs block

      Input the Questions and Answer of that question

      Hotel Manager

      1. Hotel manager

      Navigate to Dashboard > Hotel, this is Hotel manager. You can do Bulk Action(Delete, Trash) any Hotel or Search by any Hotel Information like: Name, Category, Author..

      Check to the Checkbox of List Hotel then in the Bulk Action > Select to "Delete" option and Press Apply to Delete

      The Hotel List will get all Hotel that is Publish Status, View more on Page List Hotel

      => Find the way to Work with Hotel List

      Hotel Manager

      2. Create Hotel-Room

      Navigate to Dashboard > Hotel > Add Hotel, then Add some information like: Name, Hotel Content, Descriptions, Attribute for Hotel..

      • Title : Use good name for Hotel will help Google find you easier
      • Content : write a detailed description about Hotel
      • Youtube Video : On this version we only support youtu video, you should upload good quality video to show it on Single current Hotel banner

      Hotel Attribute

      Navigate to Dashboard > Hotel > Attributes to see Panel manage. And just need to enter Name of Attributes => press to Add New button, new Attribute will be created

      After creating, you have to go to Manage Term of that Attribute by Press to Manage Terms to add more Term for Attribute


      Hotel Location

    • Location : Select the Location for Hotel, Create more Location
    • Real tour address : enter address for Hotel
    • Map Engine : just need to mark the point of Location in the Map, the Long&Lat information will be generated, Zoom default is 12
    • Search Field in GMap: try to input some text to search the Location you want instead of moving the Mark
    • Hotel Policies

    • Check-in/ Check-out time: Input your time
    • Pricing: This is the average price you want to suggest to customers
    • Room Manager

      3. Create Room for Hotel

      Navigate to Dashboard > Hotel > Edit Hotel, then Add some information like: Name, Featured Image, Price, number of Room, the acreage, Max person(Adult/Child) for room..

      • Title : Enter the room name corresponding to the room type
      • Featured image : Upload image to set the Featured image show in list Room of Hotel
      • Price : input the price of this room per day
      • Number of Room : input the Number of this type's room are available
      • Number of Bed : input the number bed of Room
      • Max Adult and Children : input the Max number of person allowed in Room(Max Adults and Children)

      Attribute for Room

      Navigate to Dashboard > Hotel > Room Attributes to see Panel manage. And just need to enter Name of Attributes => press to Add New button, new Attribute will be created

      The next step is input the Room Amenities, Press to Manage Term to Open List Amenities

      Tour Manager

      1. Tour manager

      Navigate to Dashboard > Tour, this is Tour manager. You can do Bulk Action(Delete, Trash) any Tour or Search by any Tour Information like: Name, Category, Author..

      The Tour List will get all Tour that is Publish Status, View more on Page List Tour


      => Find the way to Work with Tour List

      Tour Manager

      2. Create New Tour

      Navigate to Dashboard > Tour > Add Tour, then Add some information like: Name, Tour Content, Descriptions, Attribute for Tour..

      • Title : Use good name for Tour will help Google find you easier
      • Content : write a detailed description about Tour
      • Category : Select Tour Category will help client Filter it easier
      • Youtube Video : On this version we only support youtu video, you should upload good quality video to show it on Single current Tour banner
      • Duaration : the number is calculated by Hour
      • Tour number Person : enter the limitation(Min/Max of number Person) for Tour
      • FAQ's (Optional): Enter commonly asked questions from customers


      Tour Location

    • Location : Select the Location for Tour, Create more Location
    • Real tour address : enter address for Tour
    • Map Engine : just need to mark the point of Location in the Map, the Long&Lat information will be generated, Zoom default is 12
    •  

      Pricing for Tour

      There are 2 ways to calculate the price for Tour: Fixed Price and Price by Type of Person

      1. Fixed Price: All in price of Tour for maximum / minimum people specified

      - By default, the Tour price will be calculated according to the price you entered in the Tour Price section.

      - Each tour booking will be Inclusive tour with the number of people in the min / max range mentioned in the Tour content section, it means the number person depends on you, as long as within the allowable range

      - The part that suggests the percentage discount will always be displayed at the price in the Tour price


      2. Price by Type of Person: Check to the box to enable price for each person

      When you enable this option, all prices will only be calculated according to the price you offer for each object:

      • Chidrents: regulations from 6-15 years old - $ 560 price , only allow a minimum of 3 people and a maximum of 10 people
      • Adults: regulations from 16-50 years old - $ 560 price...
      • Old people: regulations from 50-60 years old - $ 560 price...


      Extra service(Optional): you can add more service for your Tour like: FastFood, Drinks..

      you can follow these steps below:

      • Step 1: Check to the box to Enable Extra Price
      • * But you need to REMEMBER: If you Enable it but you don't input anything, your Tour booking will be FAILED
      • Step 2: Enter title of Extra service
      • Step 3: Enter the price of service
      • Step 4: Select Type of service: price per One time or price per Person


      Discount type :

      • Cart discount – A fixed total discount for the entire cart. For example, if the cart contains a tour, a coupon for $10 off will give a discount of $10.
      • Cart % discount – A percentage discount for the entire cart. For example, if the cart contains a tour @ $60, a coupon for 10% off will give a discount of $6.


      3. Availability calendar for Tour

      Navigate to Dashboard > Tour > Availability: Add price by type of Person

      Remember the Max Guest: if you leave it blank, Your client can't book on that day

      SEO Manage:

      If you don't need SEO on site, just need to select No in the selector below:

      How to use Multi-language for Tour

      Tour Category

      3. Tour's Category

      Navigate to Dashboard > Tour > Category, this is category list of Tour. On right Panel, You can do Bulk Action(Delete, Trash) any Tour or Search by name of Category

      On Left Panel, you can add Category for Tour easier.


      How to use Multi-language for Tour

      Tour Attribute 

      4. Tour's Attributes

      Navigate to Dashboard > Tour > Attributes to see Panel manage. And just need to enter Name of Attributes => press to Add New button, new Attribute will be created

      After creating, you have to go to Manage Term of that Attribute by Press to Manage Terms to add more Term for Attribute

      How to use Multi-language for Tour

      Car Manager

      1. Car manager

      Navigate to Dashboard > Car, this is Car manager. You can do Bulk Action(Delete, Trash) any Car or Search by any Car Information like: Name, Category, Author..

      The Car List will get all Car that is Publish Status, View more on Page List Car


      => Find the way to Work with Car List

      Car Manager

      2. Create New Car

      Navigate to Dashboard > Car > Add Car, then Add some information like: Name, Car Content, Attribute for Car..

      • Title : Use good name for Car will help Google find you easier
      • Content : write a detailed description about Car
      • Youtube Video : On this version we only support youtu video, you should upload good quality video to show it on Single current Tour banner
      • FAQ's (Optional): Enter commonly asked questions from customers
      • Car's Photo: Featured image is shown in Car listing, Banner image + Gallery is shown on Car Detail
      • Extra Infor : you can input some infor like: Passenger, Gear Shift, Baggage, Door number


      Car Location

    • Location : Select the Location for Car, Create more Location
    • Real tour address : enter address for Car
    • Map Engine : just need to mark the point of Location in the Map, the Long&Lat information will be generated, Zoom default is 12
    •  


      3. Availability calendar for Car

      There are 2 types of Availability: Always Availability and Only available on specific dates

      • Always Availability: this is normal tour you can update price easy
      • Only available on specific dates: Calendar is advanced features, Calendars purpose is set price for Special date. So, all price is set in Tour content willn't be updated on the Calendar and you need to set price direct in Calendar

      Navigate to Dashboard > Car > Availability: Add price by Date, this price will be calculated in day

      Number car available in day: if you leave it blank, Your client can't book on that day

      Status: If you un-check to Available for booking? All car in day will be disabled

      SEO Manage:

      If you don't need SEO on site, just need to select No in the selector below:


      * From Vendor Dashboard

      Booking Report in Vendor Dashboard


      How to use Multi-language for Tour

      Car Attribute

      4. Car's Attributes

      Navigate to Dashboard > Car > Attributes to see Panel manage. And just need to enter Name of Attributes => press to Add New button, new Attribute will be created

      After creating, you have to go to Manage Term of that Attribute by Press to Manage Terms to add more Term for Attribute

      Space Manager

      1. Space manager

      Navigate to Dashboard > Space, this is Space manager. You can do Bulk Action(Delete, Trash) any Space or Search by any Space Information like: Name, Category, Author..

      The Space List will get all Space that is Publish Status, View more on Page List Space


      => Find the way to Work with Space List

      Space Manager

      2. Create New Space

      Navigate to Dashboard > Space > Add Space, then Add some information like: Name, Space Content, Descriptions, Attribute for Space..

      • Title : Use good name for Space will help Google find you easier
      • Content : write a detailed description about Space
      • Youtube Video : On this version we only support youtu video, you should upload good quality video to show it on Single current Space banner
      • FAQ's (Optional): Enter commonly asked questions from customers
      • Extra Informations:
        • Number Bed
        • Number of Bathroom
        • Square


      Space Location

    • Location : Select the Location for Space, Create more Location
    • Real Space address : enter address for Space
    • Map Engine : just need to mark the point of Location in the Map, the Long&Lat information will be generated, Zoom default is 12
    •  

      Pricing for Space

      Pricing Table: All in price of Space for maximum people specified

      - By default, the Space price will be calculated according to the price you entered in the Space Price section.

      Max Guests : enter the limitation(Min/Max of number Person) for Space

      - Each Space booking will be Inclusive Space with the number of people in the max range mentioned in the Space content section, it means the number person depends on you, as long as within the allowable range

      Remember the Max Guest: if you leave it blank, Your client can't book on that day


      Extra Price for Space:

      Check to the check-box to Enable Extra Price for Space

      3. Availability calendar for Space

      Navigate to Dashboard > Space > Availability: Add price by number of Night

      SEO Manage:

      If you don't need SEO on site, just need to select No in the selector below:

      Space Attribute

      3. Space's Attributes

      Navigate to Dashboard > Space > Attributes to see Panel manage. And just need to enter Name of Attributes => press to Add New button, new Attribute will be created

      After creating, you have to go to Manage Term of that Attribute by Press to Manage Terms to add more Term for Attribute

      Register New Vendor

      + Page Register for vendor

      1. Create Page Register

      Go to Dashboard > Templates > find the element Vendor Register form then input informations: Title, Description, youtube link and Featured image for youtube link. .

      Manage the List Vendor Register: go to Users > User UpgradeRequest

      Vendor Dashboard

      Vendor Payout

      1. Booking-Core's Payouts is a manual payment method
      2. So the list of payment methods is not the same as booking, this list is manually entered in the Settings vendor
      3. + Vendor Settings Payout > Payout Options : Enter banking information or any payment methods that admin supports pay for vendor

      4. After the list is available, the vendor needs to enter the corresponding account information
      5. Payout Options > Booking Status Conditions: Select booking status will be used for calculate payout of vendor, Ex: Only pay for bookings with paid status (selected multiple)
      6. The next condition for being able to make a payout is the balance in the vendor's account
      7. After sending the request successfully, the email will be sent to the admin and vendor
      8. Payout Listing : Admin makes payment manually for the vendor according to the amount requested by the vendor and then updates the status with the Bulk Action button
      9. The notes for the Admin (sent from the Vendor) and the notes for the vendor (sent from the admin) will be attached in the Email each Update status of the Payout item in the list.
      10. If status = paid, the balance will be deducted

      Vendor Profiles

    Hotel Settings

    –  Hotel Settings : This provide you some options that help you adjust layout Search for Hotel.

    1. Title page: the text show on the top site bar

    2. Image banner: You should use image with size: 1920 x 500(px)

    3. Layout Search: now we are supporting 2 styles to show list Hotel: Grid style and List style

    4. From version 1.3.0, our Booking Core system is ready for Smart search features, which means you can easily use Search feature on your website. Here are some guidelines:

    Map Search Fields

    * Check layout for Hotel + Space + Car by the link below

    - Layout Map for Hotel

    * Admin Configure for Search section in Map layout

    We are supporting 5 types of search fields corresponding to 5 search fields of search Map

    • Location type: will be shown like the dropdown list or Smart search
    • Attribute type: have sub-selector for Attribute type, just need to select the Attribute you want to show it as the dropdown list
    • Date type: will show Estimated time period for making a booking, include Start Date and End Date
    • Price type: will be shown as a ruler, the min-max price will be queried in all Data of corresponding module
    • Advance type: will show all the remain Attributes list as the Checklist


    SEO Manage:

    If you don't need SEO on site, just need to leave the blank those field below:

    Review Hotel options

    Click on Dashboard > Settings > Hotel Settings

    • Write Review: Allow you to turn ON/OFF review form for Hotel
    • Enable review after booking: Check to the box to REQUIRE booking a Hotel before doing Review
    • Review approved: Check to the box to REQUIRE admin's approving the Review before Public
    • Review criteria: You can also create other evaluation criteria for your Hotel by clicking button Add new or red trash icon on the right top of each option.

    Booking Fee:

    From version 1.3.0, Admin can Add Booking fees for space and tour, such as: tax fees, Insurance fees, booking fees.. All this fees will come to Admin Amount

    Vendor Option:

    There are 2 options to limit vendor processing rights:

    Hotel created by vendor must be approved by admin: When vendor posts a service, it needs to be approved by administrator Or not

    Allow vendor can change their booking status

    Car Settings

    –  Car Settings : This provide you some options that help you adjust layout Search for Car.

    1. Title page: the text show on the top site bar

    2. Image banner: You should use image with size: 1920 x 500(px)

    3. Layout Search: now we are supporting 2 styles to show list Car: Grid style and List style

    4. From version 1.3.0, our Booking Core system is ready for Smart search features, which means you can easily use Search feature on your website. Here are some guidelines:


    Map Search Fields

    * Check layout for Car by the link below

    - Layout Map for Car

    * Admin Configure for Search section in Map layout

    We are supporting 5 types of search fields corresponding to 5 search fields of search Map

    • Location type: will be shown like the dropdown list or Smart search
    • Attribute type: have sub-selector for Attribute type, just need to select the Attribute you want to show it as the dropdown list
    • Date type: will show Estimated time period for making a booking, include Start Date and End Date
    • Price type: will be shown as a ruler, the min-max price will be queried in all Data of corresponding module
    • Advance type: will show all the remain Attributes list as the Checklist


    SEO Manage:

    If you don't need SEO on site, just need to leave the blank those field below:

    Review Car options

    Click on Dashboard > Settings > Car Settings

    • Write Review: Allow you to turn ON/OFF review form for Car
    • Enable review after booking: Check to the box to REQUIRE booking a Car before doing Review
    • Review approved: Check to the box to REQUIRE admin's approving the Review before Public
    • Review criteria: You can also create other evaluation criteria for your Car  by clicking button Add new or red trash icon on the right top of each option.

    Booking Fee:

    From version 1.3.0, Admin can Add Booking fees for space and tour, such as: tax fees, Insurance fees, booking fees.. All this fees will come to Admin Amount

    Vendor Option:

    There are 2 options to limit vendor processing rights:

    Car created by vendor must be approved by admin: When vendor posts a service, it needs to be approved by administrator Or not

    Booking Report in Vendor Dashboard

    Allow vendor can change their booking status

    Review Manager 

    1. Review manager

    Navigate to Dashboard > Reviews, this is Review manager Only for Tour, we don't support review for News. You can do Bulk Action(Approved, Pending, Spam Delete, Trash) any review or Search by any Review Information like: Name, Review content, Author..

    The Review List will get all Review that is Approved Status,

    2. Review Setting

    Navigate to Dashboard > Settings > Tour Settings > Review Options

    Review Form

    Location Manage 

    Dashboard > Location

    You can create a location directly in the control panel

    1: On Left panel you can see the form that use to create new Location => Add new Location

    Just need to enter the Location Name, select Parent(Optional), Mark to the Map Engine then Add New

    2: On the Right Panel is list Location, you can manage it easy, do Bulk Action(Approved, Pending, Spam Delete, Trash) any review or Search by Location name


    Edit Location

      Creating Blog Posts 

      Steps to Create A Blog Post:

      Step 1 – In your Dashboard, go to Posts, Add New

      Step 2 – Enter the post’s title and content in the editing field.

      Step 3 – Add Categories: To assign it to the post, check the box next to the Category name.

      Step 4 – Add Tags: Type the words to be tagged, separate multiple tags with commas.

      Step 5 – Choose Featured image: click “Set Featured Image” then choose a image for your post.

      Step 6 - SEO post: Leave blank if you want to use Default Information to SEO

      Step 7 – When you have finished, click Publish to save and publish the post.

      User management 

      Dashboard > Users > All User

      Users are people who use services provided by customers and each user can have Role limitations. Customers can create, modify and delete users but the owner is the subscriber who is also the owner of these customers. To separate users among customers of one subscriber, user prefix is used.

      1. Easy manager and create new user.

      2. Change Password


      Roles management

      1. Sending Request Verify

      After become to Customer or Vendor Role, Admin can require your informations to verify you

      From your Dash Board you can see the Verifications menu item

      Click to Update Verification data button to open form and input the required information

      If you are Vendor Role, clients can open your Profile and see you are the trusted guys

      2. Verification New Request

      To verify new request, go to User > Verification Request, the highlight number will be shown whenever have new requests

      - Click to View request button to open a Request

      - By some means, after receiving the required information, you can call directly or email manually to confirm with Vendor.

      - The last Step, confirm to the valid information and Save

      3. Verify Configs

      Dashboard > Users > Role Manager

      Roles management

      Dashboard > Users > Role Manager

      Create New Role

      This panel is Role listing, Admin can create new Role easy, just need to enter its name.

      After create the Name of ROLE, see the Permission Matrix button

      Check to the Permission you want to share to User Role

      Subscribles management 

      Dashboard > Users > Subscribers

      You can create a user directly in the control panel

      1: On Left panel you can see the form that use to create new Subscrible => Add new Subscrible

      Just need to enter the name, email address then SAVE

      2: On the Right Panel is list Subscribe, you can manage it easy, even EXPORT data for backup.

    Multi-languages 

    From version 1.2, our Booking Core system is ready for multi-language features, which means you can easily use multiple languages on your website. Here are some guidelines:

    1. Enable Multi-Language

    Firstly, navigate to Dashboard -> Settings -> General Settings -> Language :

    1. Select Main language: This is an important step for building your website content. Because sub-languages are only recompiled from the main language, if you are using EN as the primary language and suddenly switch to JA, your website will be failed. Because no main-content of JA to use.

    2. The next step, Enable Multi languages: Check to the box to Enable Multi-languages for site

    Multi-language for Tour

    3. After activate the Multi-languages you will see your website has Language bar


    2. Start translate for site

    We will start the example for tour, there are 3 steps to complete: Tour content, tour attribute, and Tour Block on homepage

    1. Tour Content

    The language bar only appears when updating an existed tour, which means you won't be able to create a language from the first tour creation.

    This is the Tour content of the sub-language (Japanese), there will be some hidden content such as Images sections(Featured image, Gallery, video ..), the price section ..that have been set in main language.

    In sub-languages, you can only translate content that is textual

    Multi-language for Tour


    2. Tour Attributes

    The law of multilingual is only able to translate the available content, as well this is the Tour's Attribute Management Part

    In the Tour Attributes, there are 2 things need to clearly:

    1. Multi-language for Attributes

    - Click to edit button or Name of Attribute to go to edit page

    - Navigate to the Sub-Language tab and do translate

    2. Multi-language for Term's attribute

    - Click to Term Manager of duration respectively to view list term

    - Click to the Term's name to edit it

    - Navigate to the Sub-Language tab and do translate

    Multi-language for Tour


    3. Tour Block of Homepage

    Multi-language for Tour


    4. Translate Booking Core script click here to know..

      Report manage 

      Dashboard > Report > Booking Report

      On this Panel is list Booking , you can manage it easy, do Bulk Action: Mark as Completed, Mark as Processing, Mark as Confirmed, Mark as Canceled, Mark as Paid, Mark as UnPaid, DELETE Booking or Search by booking name or owner booking tour

      Booking Statistic 

      Earning statistics Management

      On this panel you can manage your Earning easier

      System Logs 

      Log data is one of the most valuable assets in IT security intelligence. Logs can give you a general overview of your system and let you gain powerful insights into its vulnerabilities.

      Specialized event log management tools will make the IT admin’s life easier.

      Languages manage 

      The First Step to build Multi-language is Create the Language for site, navigate to Dashboard > Tools > Language

      to see the Language Panel

      1. Select the Language you want to add

      2. Enter the Flag code of language, you can find more here

      3. Press to Save button to build

      Translations Manager 

      All our Booking System are translation-ready which means that you can easily translate them into any language you want. Here are some instructions:

      Firstly, navigate to Dashboard -> Translation -> Site language, see the Translated column, its 0/0. That's mean your site is empty.

      Secondly, START Build language file

      Thirdly, press to Translate button, to START translate file

      - In the Translation Page: just need to translate in the order given or search the key you want to change

      Fourly, Build language file:

      - Back to Translate Manager Page, then BUILD file Once again

      The Final: Set language for site

      Navigate to Settings > General Settings > Language this is REQUIRED step, Select the main language to Apply the change.

      Thank you for used our product Booking Core 

      Version 1.1.0 - Jul 10 - 2019

      - NEW:

      + Tour Booking Calendar: View all your tour bookings in calendar (Only for Admin, will update for Vendor later)

      + Stripe Standard Payment Gateway

      + Change default forgot password email template to match our design

      + Add bulk actions for Language Management page

      + Add options for enable ReCaptcha in Login/Register and Booking form

      + Move uploads folder to "public/uploads", you need to copy all old files under "storage/app/public" to "public/uploads"

      + Add "Find Translations" button in Translation Tool

      - Fix:

      + Bug create/update user

      + Bug in translations tool

      + Bug button "remove" in tour page does not work

      + Change default image size in tour search page to width: 600px (old is 150px)

      + Bug in delete menu item

      + Other small improvements

      See How to Update system

      Thank you for used our product Booking Core 

      Version 1.2.0 - Aug 7 - 2019

      - NEW:

      + Multi language for site

      + Add Post Type Space for Rental

      + Add pagination for Media Uploading

      + Add Config Email settings in admin Dashboard

      + Add Config Timezone in settings

      + Add Favicon option

      + Booking report for vendor

      + Add Options to change Contact information


      - Fix:

      + [Fixed] error Create Tour in vendor panel

      + [Fixed] Date time issue in the form search

      + [Fixed] Scroll issue in Testimonial Block in Home Template

      + [Fixed] Openstreemap

      See How to Update system

      Thank you for used our product Booking Core

      Version 1.6.0 - March 17 - 2020

      - UPDATE:

      - Form Register Vendor: add the Phone number field

      - Video in Register vendor page is turned off without pressing to "X" button

      - Update iCal in front- end

      - Update the Required text in Translation Tools

      - Update the Featured item is on the Top of Search

      - Update users are not allowed to leave a review after the vendor mark the booking status

      - Parent locations are ordered alphabetically on the search form.

      - Update search booking report by ID

      - Trash a review but the trash list is blank

      - Add Smart search to Location in Vendor Dashboard

      - Add Header script field in the Advanced Settings

      - Add Bulk Delete the User Role, Verify manage, Vendor Request

      - Remove the Upload settings

      - Add Vendor name to the Booking Detail

      - Add Cookie Agreement bar

      - Add Verify email option to the Email Settings

      - Add Extra service for Hotel-room, Car, Space

      - Add icon for Term - attribute of Tour

      - Add new currency: GEL - Georgian Lari

      - Add Deposit feature

      - Add detail Price for Checkout page and Booking detail

      - Add RTL Layout

      - FIXED:

      - The Sub-language: after inputting content on the sub-language -> all the Extra Price is lost

      - The Tag of News: Cant remove the tag out of the News

      - Filter Price: is not updated price follow the sub - currency

      - Blocked vendor but tour under blocked user still live

      - A Draft location is in the List Location

      - Trip Ideas on location is showing the image width 150px

      - Add option allows Print the Booking Detail

      - Booking status for Space: Full book, Block, Available

      - Space Availability is calculated by day

      - Hotel Availability is calculated by night

      - Review manage error when disabling a default module

      - Social login takes the fake email address

      - Fixed adding font- family issues

      See How to Update system

      Thank you for used our product Booking Core

      Version 1.5.1 - January 15 - 2020

      - UPDATE:

      - Multi-Language for Calendar iCal Synchronize

      - Add new Import/Export a Template

      - Add currency: Burundian Franc (BIF), AMD (Armenian dram), Uzbekistan сум, Kenyan Shilling-KES

      - Allows input Decimal to Price by Person(VD: 350.89$/ adult)

      - With Vendor Role, I want to duplicate the Tour, Space

      - Square of Room Size + Square of Space is limited to 127,can't input the 128 or larger

      - Add Confirm Email for Vendor/User after Register

      - Add Filter review rate for Tour, Space

      - FIXED:

      - [BUG] Input content in the Second-Language => Extra_serivce error

      - [BUG] Filter price isn't updated price when select other currency

      - [BUG] Share a Service in the second language the Featured image doesn't show in the post!

      - [BUG] Paypal gateway - if choose to Return to the website/Cancel (Booking) his reservation is validated

      - [BUG] Can't disable multi-Currency

      - [BUG] The switch of the currency does not appear in Mobile.

      - [BUG] Some text is missing in language file

      - [BUG] The second Language for Room title is not updated

      - [BUG] Update Language status from Draft to Publish, but can't add that language into menu Multi-language

      - [BUG] Disable Default module => Review Manager has a bug

      - [BUG] Fix issues can't upload SVG image type

      - [BUG] Service is deleted => Report Booking + Booking History from User account is bugged

      - [BUG] List Location: Delete Parent Location => Hide the child-Location but Front-end still shows Child-location

      - [BUG] Multi-currency: Tour Fees is updated wrong

      - [BUG] Service Single Video: Cant turn off if dont click to the "X" button

      - [BUG] Custom CSS code is built wrong

      - [BUG] Favicon still haven't updated for Admin backend

      See How to Update system

      Thank you for used our product Booking Core

      Version 1.5.0 - November 14 - 2019

      FULL Change Log 1.5.0

      - NEW:

      + Add Car Module

      + Add Identity Verify for user and vendor

      + Show Identity Verify

      + Role name On vendor profile

      + Add SMS Notifications

      + Add Multi-currency

      + Add Map Layout for Hotel/Space/Car

      + Add Block New

      - UPDATE:

      + Update translating the Booking statuses

      + List Location can take by location ID

      + Vendor signup form add new business name field

      + Add Captcha for Form Vendor Register

      + Remove the "/en" in link URL if "/en" is main language

      + Limit the User ID in link Vendor Profile, only Vendor role can be opened link Profile

      + Modification "number of rooms"

      + Currency add DZD – Algerian Dinar

      + Optimize the Manager of Media image

      - FIXED:

      + Payout history issues: shows payout history for all vendor

      + The Booking Form is overridden to the Loginform when it requires users to log in before the Book

      + Price Tour

      + Space in Availability table is calculated wrong

      + Select Square Size Unit but it's not change

      See How to Update system

      Thank you for used our product Booking Core

      Version 1.4.0 - October 04 - 2019

      FULL Change Log 1.4.0
      - NEW:

      + [Add] Hotel-Room Module

      + [Add] Payout Module for Vendor

      + [Add] The business name for vendor

      + [Add] Options to hide email, phone in Vendor Profile

      + [Add] Update vendor profile layout

      + [Add] Avaibility Tour/Space for Vendor Dashboard

      + [Add] Vendor can change Service Status(Make Hide/Publish)

      + [Add] Add options to allow Vendor can change his own booking status

      + [Add] Add Social Share buttons in Tour/Space/Hotel

      + [Add] Search field for Gmap Metabox while creating new Tour/Space/Hotel

      + [Add] Delete button in Media list

      + [Add] Dinar tunisien TND Currency

      + [Add] Tool Check PHP version before installation

      + [Add] Load the Default translate

      + [Add] Auto updater in Dashboard -> Tools

      + [Add] Include and exclude option for the tours

      + [Add] Availability Booking information: Booked / Full Booking

      + [Add] Show Role of Vendor in vendor profile

      + [Add] Show buyer fees on the form book

      + [Update] Extra Price for Space

      + [Update] Update Stripe Gateway (use token method)

      + [Update] Hide star, review count on the list, single Servces if TURN OFF the Review in settings

      + [Update] Code optimization

      + [Update] Layout Profile for Vendor

      + [Update] Review form: Hide form if guests can't be commented

      + [Update] Option allow view Location single that is created in List Location Block(Setup in Template)

      + [Update] Tour FAQs text editor


      - Fix:

      + [Fixed] Tour Map Layout on Mobile

      + [Fixed] Issues while using Default Language(Turn off Multi-Lang)

      + [Fixed] Translate is missing text

      + [Fixed] Multi-lang bug in Template builder

      + [Fixed] Message button is overrided on the Filter list

      + [Fixed] Cached issues

      + [Fixed] Can't upload image in template

      + [Fixed] The image is added in the Content section that can't be saved

      + [Fixed] Tour Draft still show in Related Tour

      + [Fixed] Space booking issues in 1 day

      See How to Update system

      Thank you for used our product Booking Core

      Version 1.3.1 - Sep 1 - 2019

      - HOT FIX:

      + [Fixed] Booking settings

      + [Fixed] Registration Issues

      + [Fixed] Several incidents issue


      Version 1.3.0 - Aug 30 - 2019

      FULL Change Log 1.3.0
      - NEW:

      + [Add] Availability calendar for Tour

      + [Add] Location Detail Page

      + [Add] Live Chat for Customer and Vendor

      + [Add] Wishlist for User Panel

      + [Add] Commission system for Vendor

      + [Add] Vendor Profile

      + [Add] Show Total Price in Tour's Booking form

      + [Add] Add Booking fees for space and tour

      + [Add] Smart search location for space and tour

      + [Add] Page Register for vendor

      + Allow admin to duplicate content for tour and space

      + Update filter get featured item in Block Template


      - Fix:

      + [Fixed] Can't embed youtube iframe in the editor

      + [Fixed] Translate tool shows wrong count number(%)

      + [Fixed] Don't show next button on the calendar

      + [Fixed] Multi-lang bug in Template builder

      See How to Update system

      Thank you for used our product Booking Core 

      Released: 27 June 2019

      Made by: Booking Core Team  

      Get support at: Facebook community

      Request and Vote Features you want on Booking: Check it here

      We are one of the strong teams in developing Online Booking system, trusted by over 10,000 customers. However, we are also looking forward to the positive feedback as well as the contributions to build a perfect Booking system.

      We would like to express our sincere thanks to our customers , who are companions and stick with us all the way ahead.

      Cordially greet and to win!


© Copyright 2019, Booking Core Team.